Lyneen's 2021 Class Kits Instructions

Showing posts with label Altered Frame. Show all posts

Sunday, October 2, 2016

31 DAYS OF HALLOWEEN - Day 2


31 DAYS OF HALLOWEEN 2016 CHALLENGE

I will be posting a Halloween project each day during the month of October. Halloween is one of my favorites holidays... join me daily and comment on my blog each day.  I will have a weekly drawing from all of my comments.... each day you comment your name is put in the draw!  Tuesdays I will share what the giveaway will be for that week. Fridays at Midnight I will draw a name and include the winner in my Saturday post!

I am really excited to be a part of the  31 DAYS OF HALLOWEEN and this amazing group of artists!

Now for my Next project... HELP ME!


Supplies:
Kaiser Craft Frame
Black Gesso
Authentique Halloween Papers
Tim Holtz Spiders and Spooky Cameos
Little B Poison Bottles
Petaloo Flowers
Other items from stash!


Remember to comment each day
 for  more chances in my weekly drawing! 


Then be sure to visit the artists in the blog roll below...
all posts are scheduled to be up at 9am PT!

 
Happy 31 days of Halloween
29 more to go! 

 31 Days of Halloween 2016
Terra
Sarah
Alison
Amanda
Lyneen
Susan S
Shell
Susan R
Lost Coast Portal To Creativity
Monique
​Dream In Darkness
Airless Chambers
​Jessica
​Michelle
Kelli
Kapree
Genny
Sue
Lisa
​ ​ ​

Saturday, July 23, 2016

Dixie Belle... Window of Paris!

Last weekend I went to a crop at the Scrapbook Zone.  I took my Dixie Belle Paint - Buttercream and Dixie Belle Van Dyke Glaze, they came in handy when I saw this bare window frame sitting on the counter!  I just could not resist using them.  I shared this on the Altered Pages blog this week!
 
 
If you know my art, you know I love PARIS!
 
 
The Window Shadow Frame is pencil thin.  I painted the bare  frame with 2 coats of  Dixie Belle Paint - Buttercream


Arrange charms, chipboard and wood pieces in the frame.


Once the frame was dry apply Dixie Belle Van Dyke Brown Glaze to distress the frame.


Apply pattern paper to the back board of the window with glue stick.  With tacky glue attach the frame of the to the backboard the paper has been glued to!  Use clothes pins to hold in place until dry! 


While the glue dries, ink and heat emboss wood crown and fluer de lis with Pirate Black Embossing Powder!


Assemble items using tacky glue!


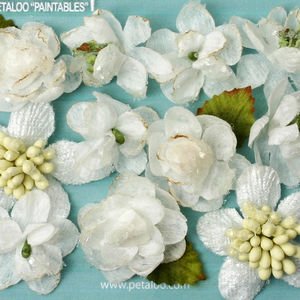
The flowers are Petaloo Paintables, I used spray mist to color the white flowers the perfect pink!


Attach items inside each frame and to the frame!


Add Dew Drops and flowers and other embellishments to cover holes on charms!


Saturday, August 10, 2013

"Open Me"

"Open Me" is an altered frame from the thrift store. When I am not creating in my studio you will find me on the hunt.  I love to frequent thrift stores, garage sales and auctions, looking for items that can be up-cycled, like this frame (cost $1.00).


The frame was altered using products from The Robin's Nest and Clearsnap. The featured paper this month is the Robin's  Nest Classic Swirl paper.   All the papers in the Classic Glitter Swirl collection on sale this month - 20% off!
 
This is a before picture of the frame. 
Sand the frame to remove some of the paint, this allows the glue to stick to the surface. If not sanded the paper would peel off the smooth paint in a matter of time. Ink the edges with brown and spritz Gold Glow Smooch Spritz on surfaces that won't be covered with paper.
Cut The Robin's Nest White Glitter Swirl Cardstock to fit the frame. To distress paper use a cosmetic sponge, starting off the edge of the paper take a swirling motion to apply. The glitter on the paper acts like a resist. Adhere with a quick dry glue. File the edges with sand paper or a nail file, gently ink edges to give it a finished look.   
 
Prepping the faries: Ink the GinasDesign Fairies with Patina Mixd Media Inx from Clearsnap, then spritz with Gold Glow Smooch Spritz. Add a bit of Clearsnap Sparkling Amethyst Glitter to the wings!
Use Clearsnap Design Adhesives make the tag on the out side of the frame. Cut the double sided adhesive "OPEN ME" from the sheet. Adhere to a piece of white card stock and sprinkle with Clearsnap Sparkling Amethyst Glitter.  It is amazing how well the adhesive holds the glitter. Spritz with Gold Glow Smooch Spritz, let dry then cut out and adhere to the door. 
Also on the out side on of the door screw an eyelet (the kind used for wire to hang pictures). Tie ribbon with key to the eyelet. Adhere the keyhole that has been distressed with brown ink and spritzed with Gold Glow Smooch Spritz.
What is a project without a little bling!!!
On the frame I used:

 Mount sitting fairies on the the inside of the panels.
Precious Girl Diamonds Dew Drops (Purple) add a finishing touch to the arch on the frame. 
The fairy in the center is mounted on The Robin's Nest Pink Classic Glitter Cardstock with foam dots. Hyacinths Dew Drops finish the inside of the frame. 
I will be using this frame as a background for my fairy collection!

Robins Nest

Clearsnap

Supplies from stash
Ribbon
Key - Graphic 45
Keyhole - LeakyShed
Ginas Designs Fairies
Eyelet Screw

Tools
Cosmetic Sponges
Paper Cutter
Files
Sandpaper
Foam dots
Quick Dry Glue

Please visit the Clearsnap blog and see what their Design Team created with The Robin's Nest Classic Swirl Papers this week!

Until next time... KEEP CREATING!!!

Don't forget the 20% off of all