Lyneen's 2021 Class Kits Instructions

Showing posts with label Charms. Show all posts

Saturday, October 10, 2020

31 Days of Halloween 2020 -Day 10

 LeighSBDesigns is hosting the 10th Annual

31 Days of Halloween Blog Hop 2020!

This is my 8th year participating!

The blog hop and linky party runs Oct.1st - Oct.31st

THIS IS A STRESS FREE HALLOWEEN BLOG HOP 

A fun and easy going Hop open to Everyone!

Spooktacular prizes up for grabs!
Learn all about the hop, prizes and rules HERE!

DAY 10 WICKED BOTTLES

Last month I made these AWESOME little wicked bottles for a charm swap!
I am looking forward to getting the package of the swap back. 


I used old miniature perfume bottles.  Alcohol ink was poured inside the bottles, when they were dry the bottles were filled with black seed beads.  Each bottle has a small white skull, key, crystal, and bone with skull charms.  The labels are old Seven Gypsies stickers that I cut down and applied with Distress Medium. 


I hope everyone that participated in the swap likes their wicked bottles.

Click HERE and scroll down here to see all the artists 
SPOOKTACULAR Halloween projects!


Saturday, July 22, 2017

Home is where the heart is!!!

As promised yesterday, I said I would share the other side of HOME TWEET from Foundations Décor products. 
 
I have added a clothespin to this side of the house to make it a bit more functional.
 
Supplies:
Foundations Décor Sweet Heart House
Dixie Belle Paint Butter Creamy
Dixie Belle Van Dyke Glaze
Sunshine in my Soul 8x8  Paper Pad
Adhesive - Glue
Charms and Dog from old Monopoly game
Flowers
Metallic Luster Wax
Clothes Pin
Chipboard
Image of door


I love working on both sides of my Foundations Décor products.  My project today is the backside of my HOME TWEET HOME (above) that was shared on the Altered Pages blog yesterday.  You can see how I painted the house and created it HERE on the blog!


First, all sides of the Foundations Décor Sweet Heart House were painted with Dixie Belle Paint Butter Creamy! Let it dry, then trace the house onto the Sunshine in my Soul 8x8  Paper Pad. Apply a thin layer of glue to the house, then carefully attach the paper.  Let dry!   
 
 
Before attaching the roof to the front side I traced it onto chipboard, I wanted the house to have the same roof line on the back side. I painted the chipboard and a clothespin with Dixie Belle Paint Butter Creamy after they dried I paint then with Dixie Belle Van Dyke Glaze  removing the excess to get a distressed look.


The heart was painted  with Dixie Belle Paint Butter Creamy then distressed with  Metallic Luster Wax
 
I found an image of a door in my photos that was perfect for the house.  If you have been to Fort Worden you may recognize it.  The image was printed on copy paper and cut out.

Adhere the door, heart, roof, charm, flower and clothes pin with glue.
Add the final touches: the little key and dog a from an old Monopoly game!


I sure hope you have enjoyed the month with us!
 
 
Look for more projects using Foundations Décor products later this summer when we will be sharing some fun Fall projects.


Saturday, July 23, 2016

Dixie Belle... Window of Paris!

Last weekend I went to a crop at the Scrapbook Zone.  I took my Dixie Belle Paint - Buttercream and Dixie Belle Van Dyke Glaze, they came in handy when I saw this bare window frame sitting on the counter!  I just could not resist using them.  I shared this on the Altered Pages blog this week!
 
 
If you know my art, you know I love PARIS!
 
 
The Window Shadow Frame is pencil thin.  I painted the bare  frame with 2 coats of  Dixie Belle Paint - Buttercream


Arrange charms, chipboard and wood pieces in the frame.


Once the frame was dry apply Dixie Belle Van Dyke Brown Glaze to distress the frame.


Apply pattern paper to the back board of the window with glue stick.  With tacky glue attach the frame of the to the backboard the paper has been glued to!  Use clothes pins to hold in place until dry! 


While the glue dries, ink and heat emboss wood crown and fluer de lis with Pirate Black Embossing Powder!


Assemble items using tacky glue!


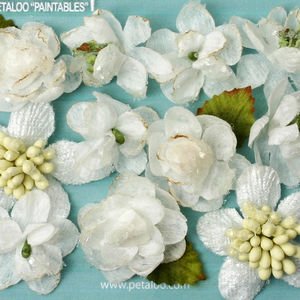
The flowers are Petaloo Paintables, I used spray mist to color the white flowers the perfect pink!


Attach items inside each frame and to the frame!


Add Dew Drops and flowers and other embellishments to cover holes on charms!


Sunday, April 17, 2016

A Beachy Shadow Box with The Robin's Nest!

Summer is on its way!!!  I have a lot of favorites when it comes to what I love to create... shadow boxes are near or on the top of my list!  Today I have for you one with Robin's Nest Palm Tree Cardstock!


Supplies:
Shadow Box
Transparent Brown paint
Robin's Nest Palm Tree Cardstock
Dew Drops Water
Dew Drops Fresh Mowed Grass
Small Starfish
Rosy Bike Chipboard
Leafy Green Compass Chipboard
Gel Medium
Charms
Shells
Tacky Glue
Foam Tape
Paint white shadow box with transparent brown paint, giving the box a color similar to sand.


Cut Robin's Nest Palm Tree Cardstock to fit the boxes of the shadow box.


Adhere Robin's Nest Palm Tree Cardstock in each section with gel medium.  In the large box adhere Leafy Green Compass Chipboard with gel medium, set aside to dry.

With tacky glue create beach vignettes in the three small boxes with Dew Drops Water, Fresh Mowed Grass, Small Starfish, seashells and charms.
 
A little ship in a seashell!
 
Sanddollar on the beach!

Anchor and Seahorse!

Adhere the Rosy Bike Chipboard with foam tape for dimension, create a beach scene around the bike, including a the bottle with a message.


To make the bottle with a message cut a piece scrap paper, roll it up and tie with heavy thread.


To finish add charms around the edge of the box to frame it!